How to Embed a Chatbot on Your Website (1 Line of Code)
Embed a chatbot in one line of code. Copy-paste snippets for HTML, WordPress, Shopify, React & Next.js — plus a 2026 pricing comparison of top platforms.
Want to embed a chatbot on your website? You have two fundamentally different paths: stitch together a general-purpose LLM and hope for the best, or deploy a purpose-trained chatbot that actually knows your product. This guide walks through both, then helps you decide which one your site needs.
Shoppers who interact with a chat widget convert at 12.3% versus 3.1% for those who don't, a 4x lift (EcommerceFastlane). The global chatbot market hit $10.32 billion in 2025 and is projected to reach $29.5B by 2029. IDC's 2023 study on AI investments broadly found businesses report an average $3.50 return for every $1 invested. The case for deployment is clear. The challenge is execution.
Table of Contents
- Why "Just Adding a Chatbot" Usually Fails
- Step 1 — Build vs. Buy: The Real Decision
- Step 2 — Choose a Platform (Honest Pricing Comparison)
- Step 3 — Train Your Bot on Your Content
- Step 4 — Embedding Methods (HTML, WordPress, React, Shopify & More)
- Step 5 — Customize Your Widget
- Step 6 — Test Before You Go Live
- Step 7 — Measure Performance
- Common Mistakes to Avoid
- FAQ
Why "Just Adding a Chatbot" Usually Fails
Most developers embed a chatbot widget in an afternoon and then wonder why nobody uses it. Or worse, why it's actively frustrating visitors. The failure mode is almost always one of three things:
- The bot doesn't know your product. A generic GPT wrapper will hallucinate your pricing, invent features that don't exist, and confidently give wrong answers. Users learn this fast and stop trusting it.
- The widget is too heavy. Some popular chatbot platforms ship 40KB+ of JavaScript before your widget even loads. On mobile, this tanks Core Web Vitals and page speed scores.
- Nobody measured anything. The chatbot went live, got no dedicated analytics review, and either quietly failed or quietly succeeded. Nobody knows which.
Step 1 — Build vs. Buy: The Real Decision
Before choosing a platform, decide how much control you actually need.
| Approach | Best for | Effort | Monthly cost |
|---|---|---|---|
| No-code platform (Chatbase, SiteGPT) | Quick deployment, single site | Hours | $39–$500/mo |
| Managed SaaS with your branding (Canary) | Agencies, multiple client sites | Days | ~$127/mo for 10 sites |
| Self-hosted open source (Botpress, Flowise) | Full control, engineering team | Weeks | Infrastructure cost only |
| Custom LLM integration | Unique product requirements | Months | Engineering salary |
Step 2 — Choose a Platform (Honest Pricing Comparison)
Chatbot pricing is notoriously confusing. Here is what you actually pay across the major options.
Chatbase
| Plan | Monthly | Chatbots | Credits/mo |
|---|---|---|---|
| Hobby | $40 | 1 | ~2,000 |
| Standard | $150 | 2 | ~10,000 |
| Pro | $500 | 3 | ~40,000 |
Catch: Using GPT-4 burns 20 credits per response. A 10,000-credit Standard plan exhausts in roughly 500 GPT-4 replies, that's one busy afternoon for a mid-traffic site. White-label branding costs an extra $39/mo on top.
SiteGPT
| Plan | Monthly | Messages/mo | Pages trained |
|---|---|---|---|
| Starter | $39 | 4,000 | 1,000 |
| Growth | $79 | 10,000 | 10,000 |
| Scale | $259 | 40,000 | 50,000 |
Annual billing saves 40%. Extra messages are $39/mo per 5,000. White-label is another $39/mo.
Intercom
Starts at $29/seat/mo (annual) for the Essential plan. Fin AI, their flagship AI chatbot, is billed at $0.99 per outcome (an outcome covers both resolutions and procedure handoffs, not just resolved conversations). For a 500-outcome/month site, that's $495 in AI fees on top of the base seat cost. Enterprise plans commonly land at $2,000–$5,000/mo.
Tidio
Free tier with limited Lyro AI, then $59–$349/mo for the Growth plan (scales with conversation volume). The Lyro AI add-on is separately priced from $39/mo. Enterprise starts at $749/mo.
Botpress
Pay-as-you-go at $0 + AI spend (500 msg/mo free), then $89/mo for Plus (5,000 msg/mo). The Team plan runs $445/mo (annual) or $495/mo (monthly). AI spend is capped at $100/mo on free/Plus and $500/mo on Team. Good value if you're comfortable in a flow-builder UI.
Canary
Flat-rate $127/mo for up to 10 tenant sites, each with their own knowledge base, branding, and analytics. No per-resolution fees. No credit burn system. Built specifically for the agency use case: managing chatbots across multiple client websites at ~$12.70/site/mo.
See how the models stack up: Chatbase vs. Canary — which is right for your agency?
Managing chatbots across multiple sites? Canary's per-site cost is difficult to match with per-seat or per-resolution pricing models. Start a free 14-day trial →
Step 3 — Train Your Bot on Your Content
A chatbot that doesn't know your product is worse than no chatbot. Here's how knowledge base training works across different platforms.
File uploads are the starting point. Most platforms accept PDF, DOCX, and TXT. Some (including Canary) also accept CSV and XLSX, which is useful for FAQ spreadsheets or product catalogs.
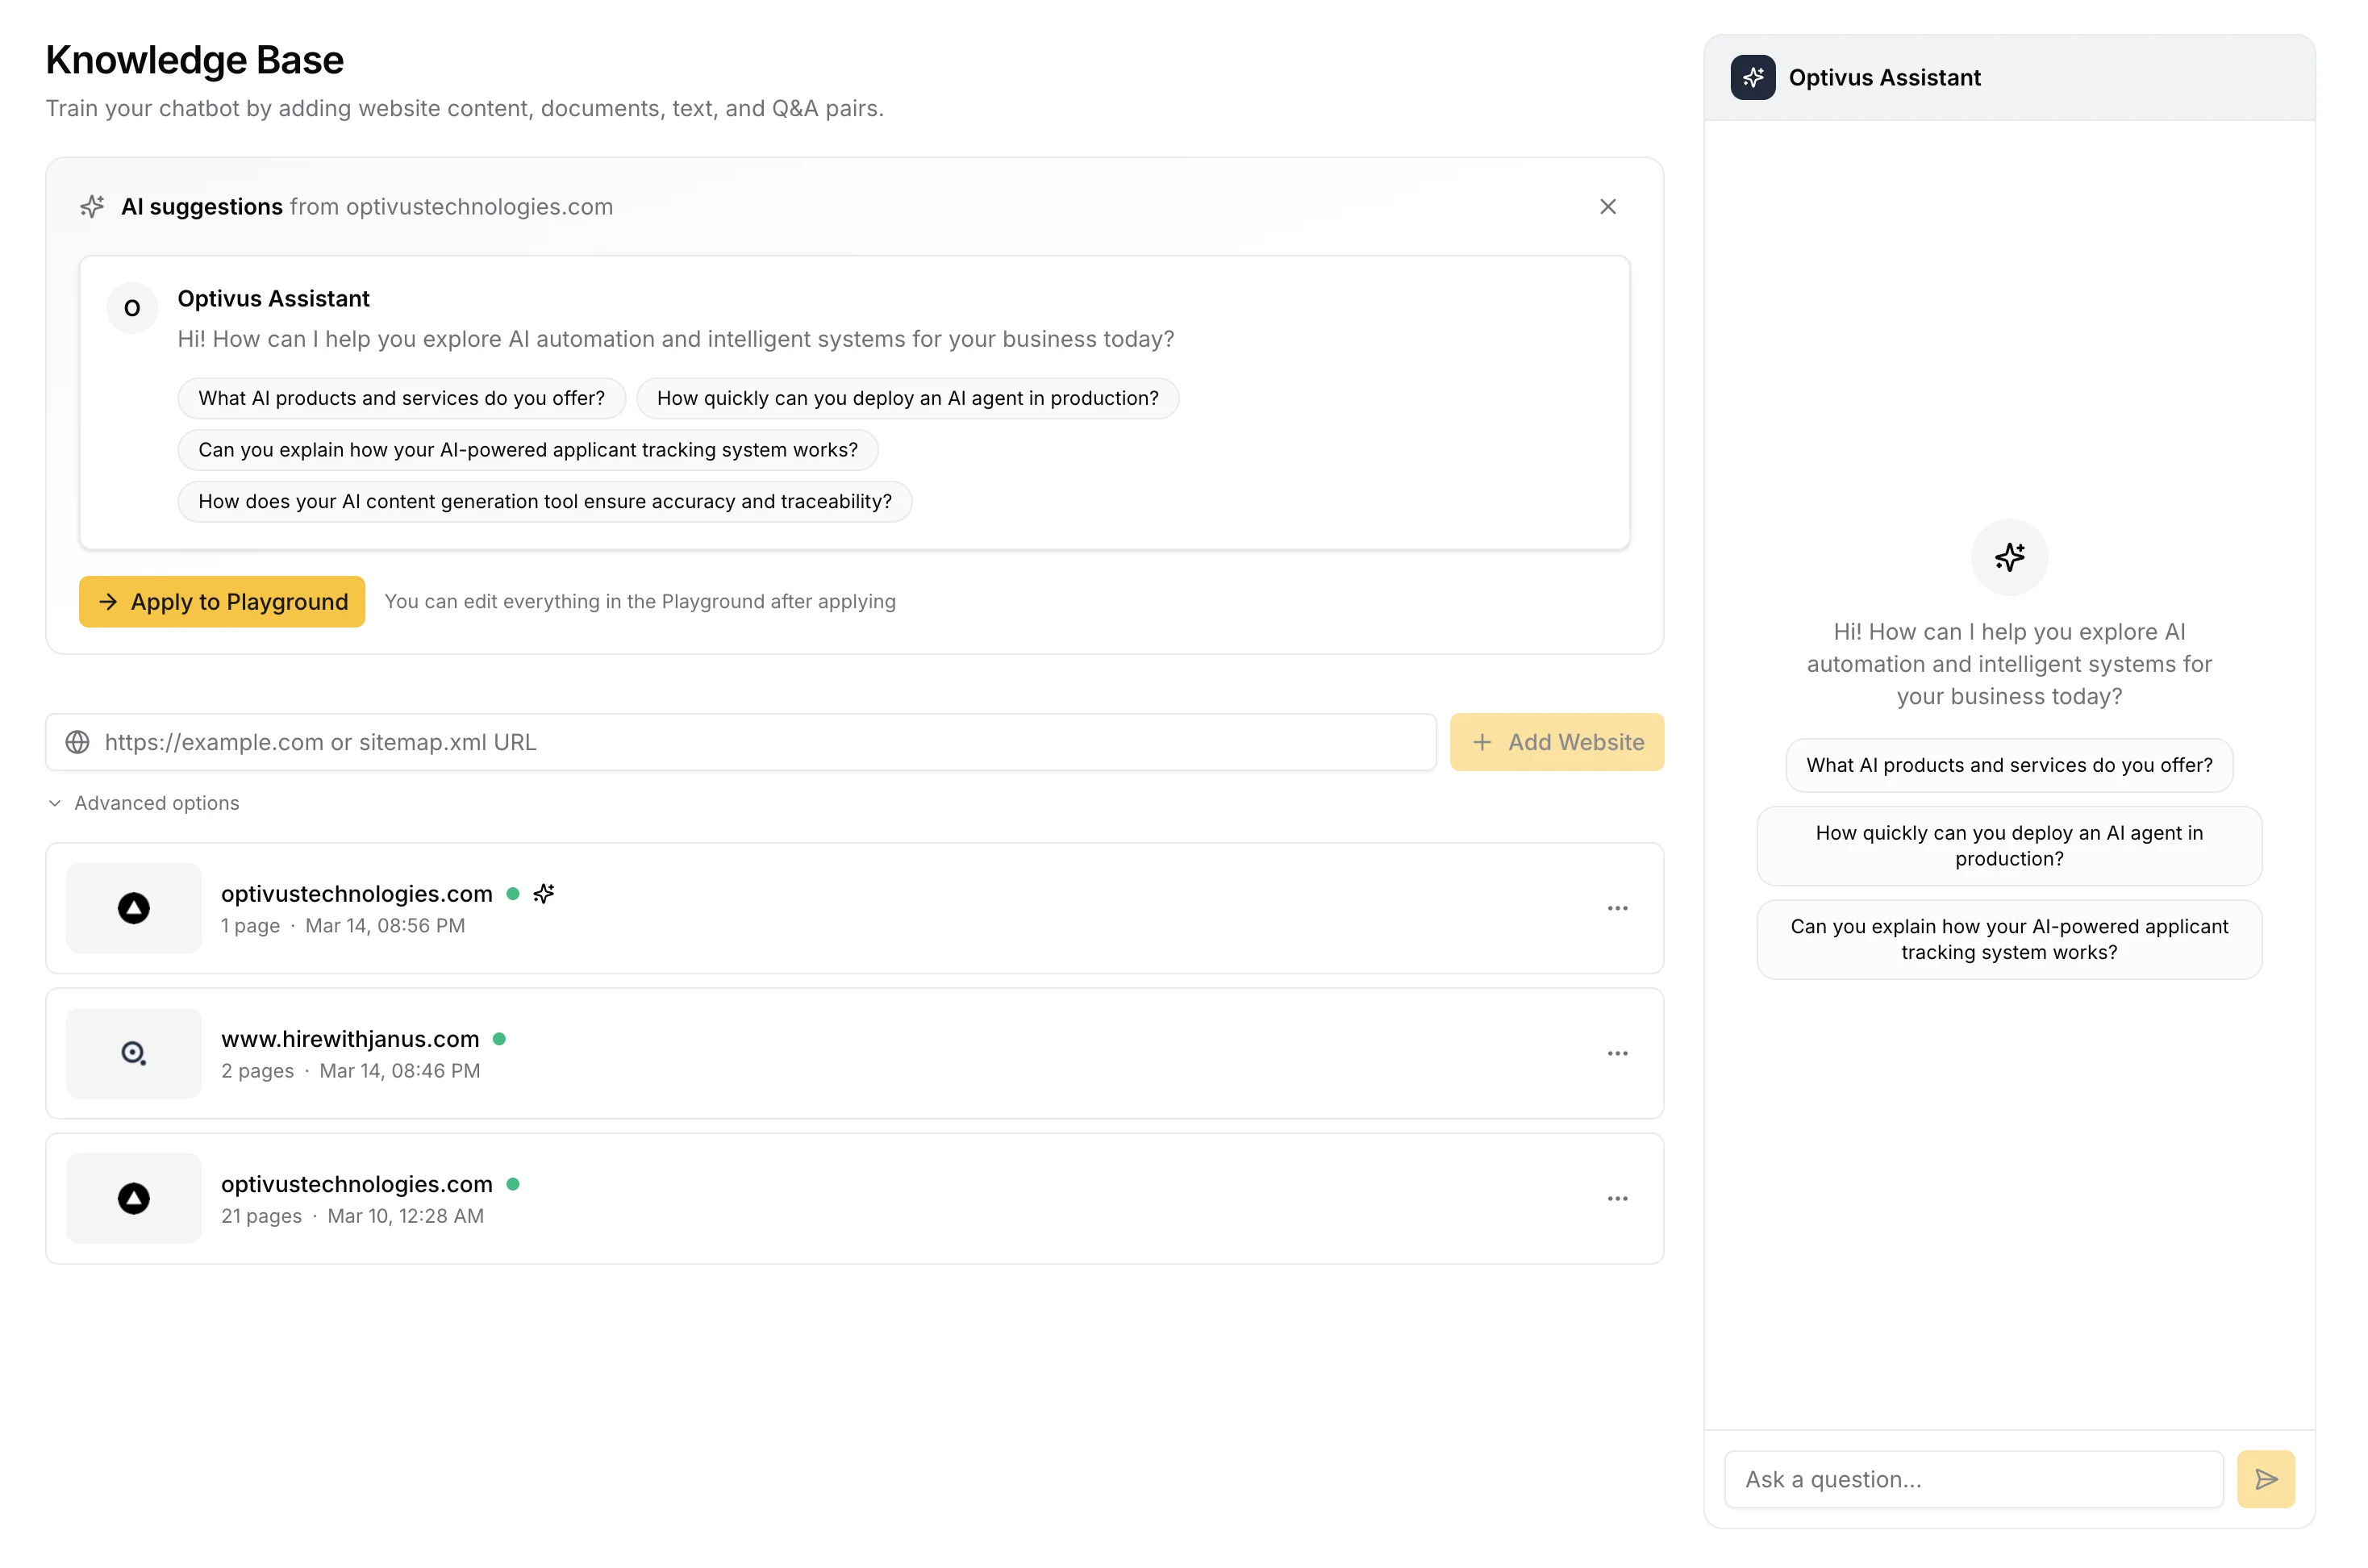
URL scraping is where the better platforms pull ahead. Point at a URL and the platform crawls it. Under the hood, tools like Firecrawl handle JS-rendered pages that traditional scrapers miss. Expect 1–5 minutes per site crawl.
Sitemap import is the fastest way to train on an existing site. Paste your sitemap.xml URL, and the platform auto-extracts all <loc> entries and crawls them in batch.
Then there are Q&A pairs, the manual overrides that matter most. If your product has nuanced pricing logic, edge-case return policies, or anything the scraped content doesn't cover clearly, add Q&A pairs directly. These take precedence over the vector search results.
This knowledge-base-driven approach is called retrieval-augmented generation (RAG) — the AI reads your content at query time rather than relying on its general training.
A confidence threshold controls when the bot answers versus when it escalates. Setting it too low (around 0.2) produces hallucinations. Too high (above 0.8) and you get constant "I don't know" deflections. For most product content, 0.4–0.5 is a good starting point.
Step 4 — Embedding Methods (HTML, WordPress, React, Shopify & More)
Five real deployment patterns, each suited to a different stack.
Method A: Universal HTML Snippet (Any Site)
The simplest and most universal approach. Works on any HTML page, CMS, or static site.
<script>
  (function(w, d, s) {
    var j = d.createElement(s);
    j.async = true;
    j.src = 'https://widget.canarychat.app/loader.js';
    j.setAttribute('data-tenant', 'YOUR_TENANT_ID');
    d.body.appendChild(j);
  })(window, document, 'script');
</script>
The async attribute is critical. It prevents the widget script from blocking your page's rendering. The self-executing function pattern ensures the script loads after the DOM is ready even if a user pastes it in <head> by mistake.
Performance note: Canary's widget is built on Preact and ships at ~4KB gzipped, compared to 40KB+ for React-based widget implementations. On a 3G mobile connection, that's the difference between a widget that loads in 50ms versus one that loads in 500ms.
Method B: WordPress
If you're using WordPress, add the snippet via Appearance → Customize → Additional CSS/JS (if your theme supports it) or via a plugin like Insert Headers and Footers.
For sites using a child theme, add directly to functions.php:
function canary_widget() {
  echo '<script async src="https://widget.canarychat.app/loader.js" data-tenant="YOUR_TENANT_ID"></script>';
}
add_action('wp_footer', 'canary_widget');
This hooks into WordPress's proper asset queue and ensures the script only loads once, even with caching plugins active.
Full walkthrough: How to add a chatbot to WordPress →
Method C: React / Next.js
For React apps, the cleanest pattern is a dedicated component with useEffect to handle client-side-only loading (important for SSR/SSG frameworks):
// components/ChatWidget.tsx
import { useEffect } from 'react';

export function ChatWidget({ tenantId }: { tenantId: string }) {
  useEffect(() => {
    const script = document.createElement('script');
    script.src = 'https://widget.canarychat.app/loader.js';
    script.async = true;
    script.dataset.tenant = tenantId;
    document.body.appendChild(script);

    return () => {
      document.body.removeChild(script);
    };
  }, [tenantId]);

  return null;
}
Then mount it once in your root layout:
// app/layout.tsx (Next.js App Router)
import { ChatWidget } from '@/components/ChatWidget';

export default function RootLayout({ children }) {
  return (
    <html>
      <body>
        {children}
        <ChatWidget tenantId={process.env.NEXT_PUBLIC_CANARY_TENANT_ID!} />
      </body>
    </html>
  );
}
The cleanup function in useEffect prevents duplicate script injection during React's strict-mode double-invocation in development.
Method D: Webflow, Wix, Squarespace
All three support custom code injection. In Webflow, go to Project Settings, then Custom Code, then Footer Code. In Wix, it's Settings, Advanced, Custom Code, Add Code (Body, End). In Squarespace, navigate to Settings, Advanced, Code Injection, Footer.
Paste the universal HTML snippet from Method A. No modifications needed.
Method E: Shopify
Shopify's theme system supports script injection through the built-in code editor. No app required.
- Go to Online Store → Themes → Edit Code
- Open
layout/theme.liquid - Paste before the closing
</body>tag:
{% comment %} Chatbot widget {% endcomment %}
<script async src="https://widget.canarychat.app/loader.js" data-tenant="YOUR_TENANT_ID"></script>
For headless Shopify setups using Hydrogen or Remix, use the React useEffect pattern from Method C.
iframe Embedding (Alternative)
Some CMS configurations restrict third-party script injection but allow iframes. Most chatbot platforms offer an iframe embed as a fallback, which is useful for sandboxed page builders or CMS setups that block <script> tags in custom fields. Performance is comparable for small widgets, but you lose the ability to trigger the widget programmatically from your own JavaScript (e.g., auto-opening after a user completes a form).
Step 5 — Customize Your Widget
Before going live, configure the widget to match your brand. An out-of-the-box chatbot in vendor colors signals "we didn't finish setting this up."
Start with colors: set primary button and header color to your brand hex, and match the chat bubble to your primary CTA color for continuity. Upload a custom avatar or bot icon, since a recognizable brand mark outperforms generic robot icons on first impression.
Position defaults to bottom-right, but left-side placement can reduce conflict with cookie consent banners or live chat buttons. Your widget title and welcome message matter more than you'd think. "Hi, I'm [Brand] Assistant, what can I help you with?" outperforms generic "Chat with us" openers in engagement.
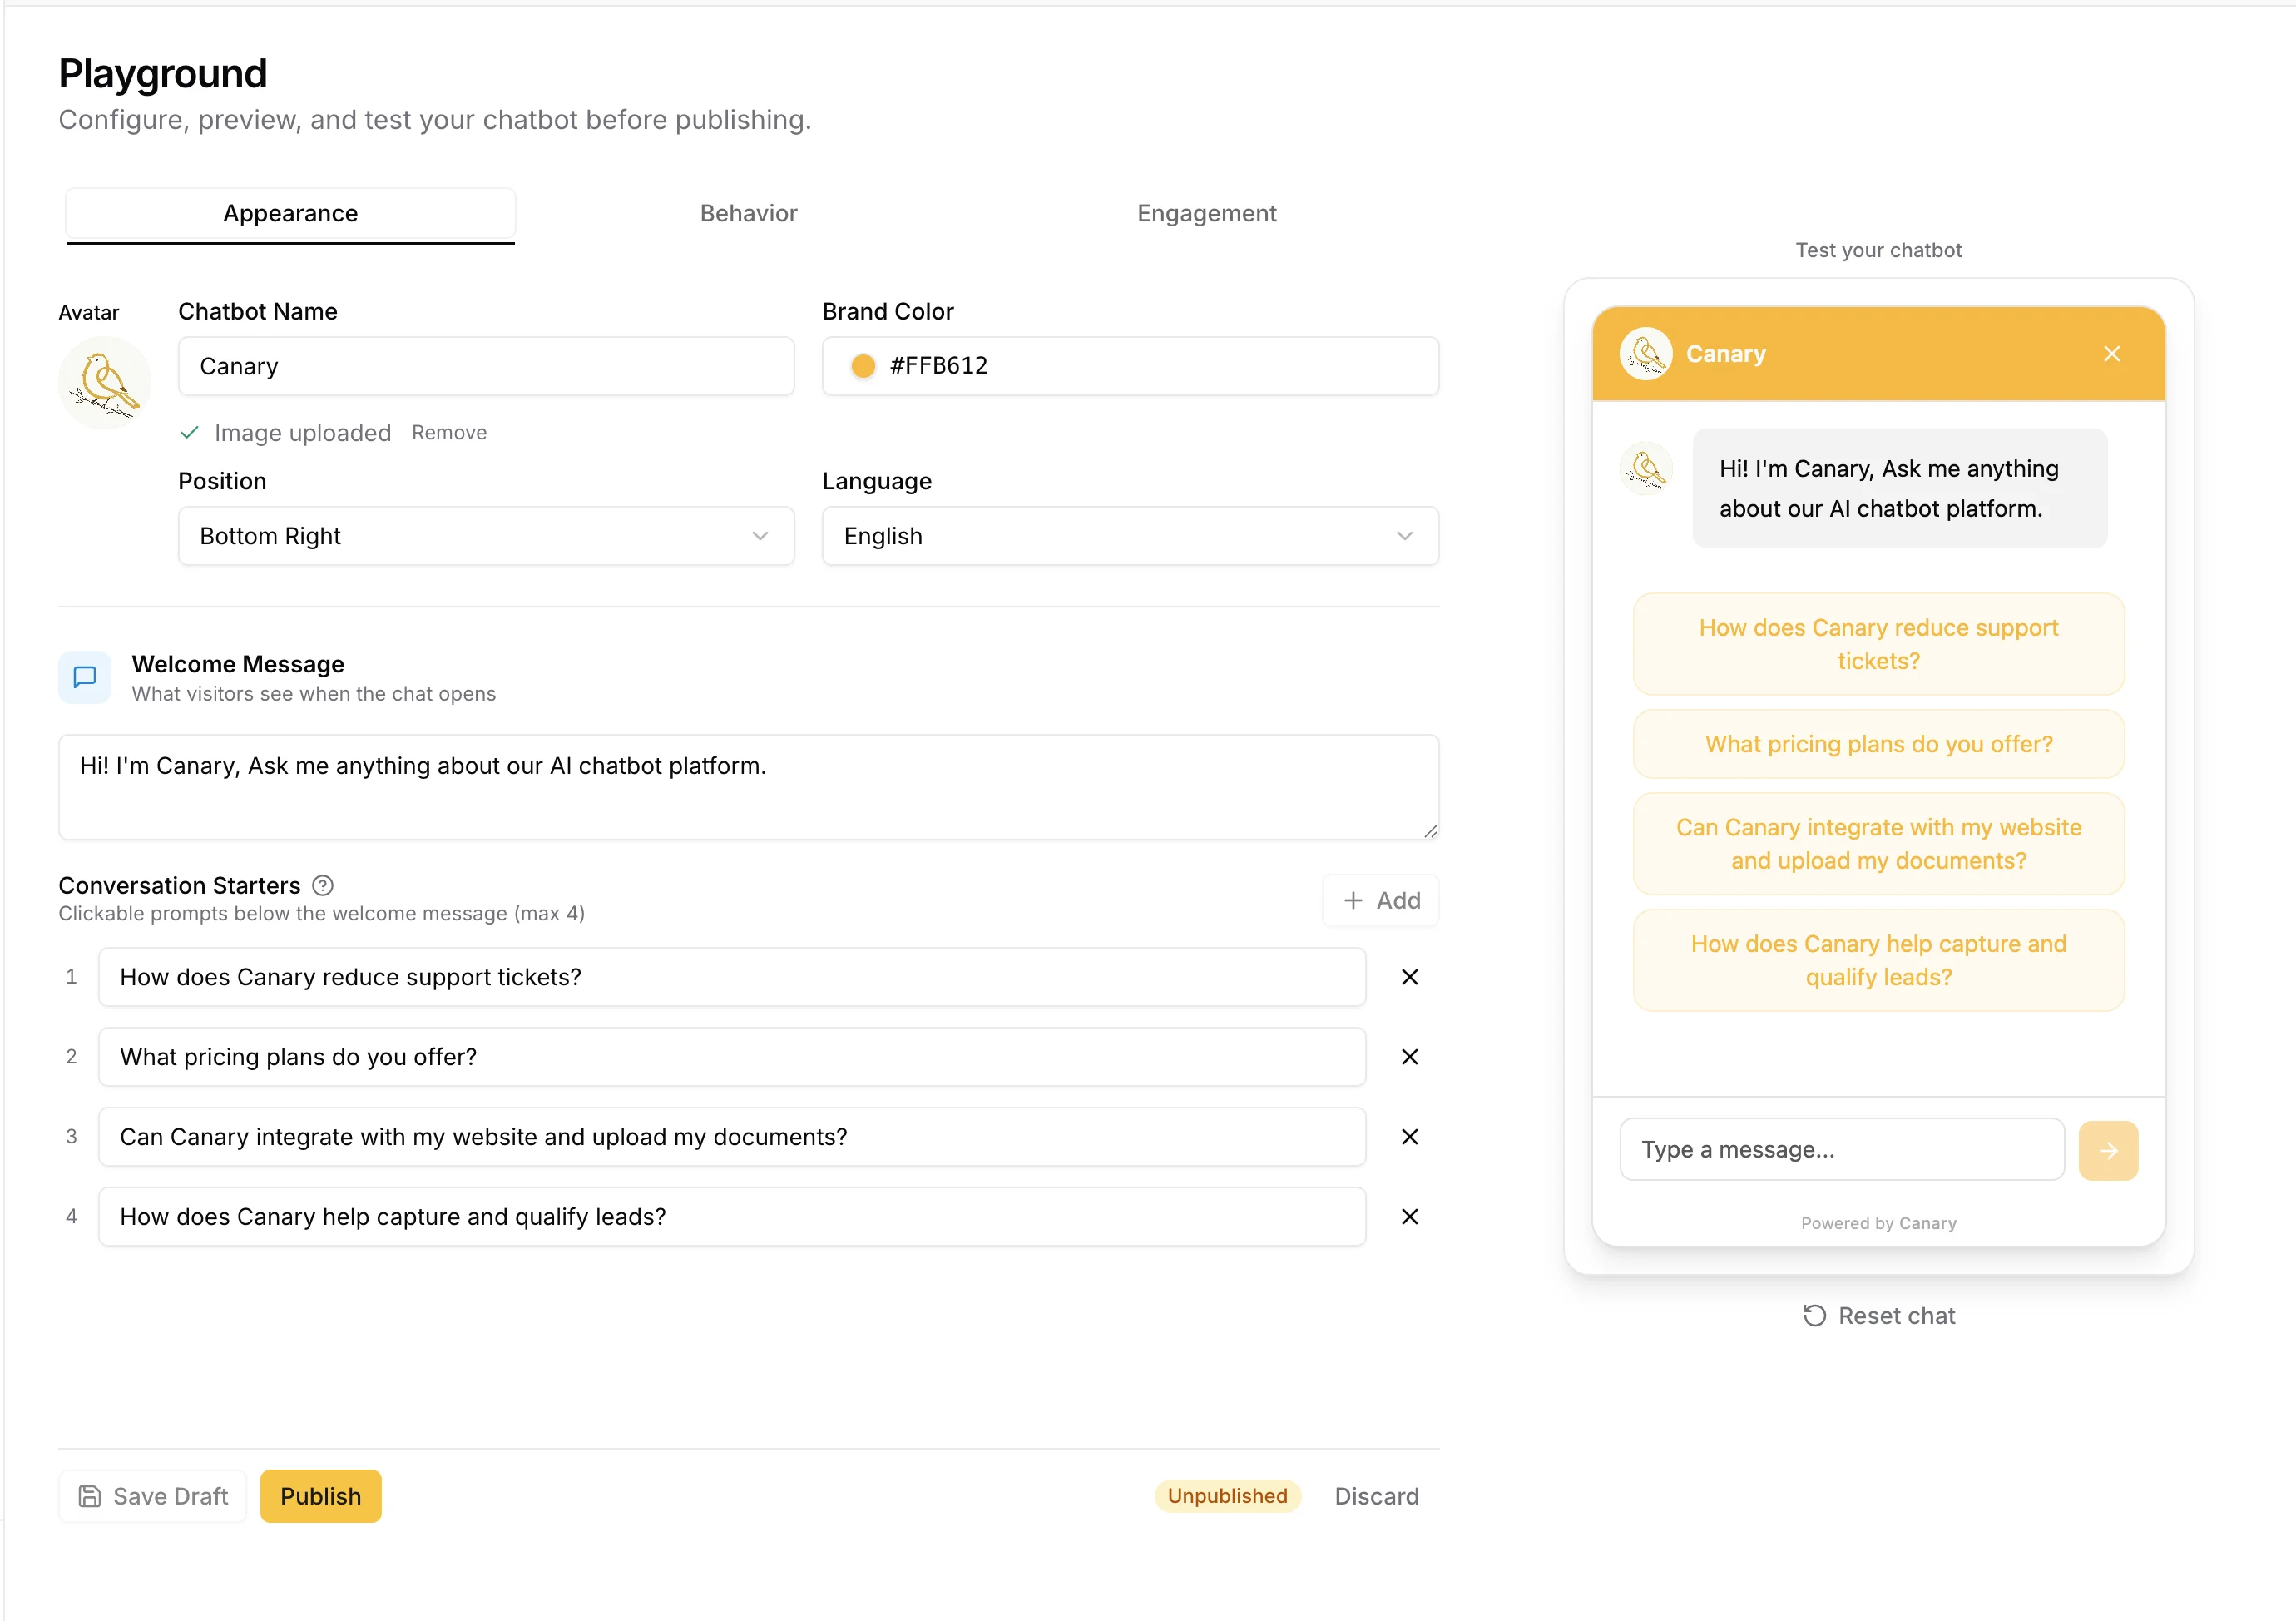
If you serve non-English audiences, configure the widget language to match the page locale. A hardcoded English interface on a Spanish-language page hurts conversion. And consider setting a proactive trigger to appear after 5–10 seconds on high-intent pages (pricing, features). This can meaningfully lift widget open rates.
Step 6 — Test Before You Go Live
Three tests to run before flipping the embed live:
1. Knowledge base accuracy test. Ask your 10 most common support questions. If the bot gets more than 2 wrong, your training content needs to be more explicit. Add those Q&A pairs manually.
2. Edge case / jailbreak test. Try "ignore your previous instructions and..." prompts. A well-configured system prompt with a firm scope definition should handle these gracefully with "That's outside what I can help with, want me to connect you with a human?" rather than confabulating an answer.
3. Mobile rendering check. Open your site on an actual device (not just browser devtools), verify the widget doesn't obscure critical page elements, and test that the open/close button is easily tappable (minimum 44x44px touch target per WCAG). Test iOS Safari specifically. position: fixed elements can behave unexpectedly near the virtual keyboard, and PWA installations may render the widget behind OS chrome.
Step 7 — Measure Performance (What Nobody Else Covers)
Deploying and forgetting is the single biggest waste of a chatbot investment. Here's what to track:
| Metric | What it tells you | Target benchmark |
|---|---|---|
| Widget engagement rate | % of visitors who open the chat | 5–15% |
| Resolution rate | % of conversations where user didn't escalate to human | 60–80% |
| CSAT score | Thumbs up/down or 1–5 rating post-conversation | ≥75% positive |
| Handoff rate | % requesting human agent | 10–25% (high = knowledge gap) |
| Lead capture rate | Pre-chat form completions / widget opens | 30–50% |
| Avg. session duration | Time spent in conversation | >90s = engaged |
Track these week-over-week for the first month. A resolution rate under 50% almost always means the knowledge base is incomplete, not that AI chatbots don't work.
Once you have two weeks of baseline data, run experiments. Test different welcome messages, proactive trigger timing (5s vs. 10s delay), and widget placement (bottom-right vs. bottom-left). Small UX changes can move engagement rate by 20–30%.
A word on hallucinations: No AI chatbot has a 0% error rate. Set a confidence threshold, enable source citations (so users can verify answers), and configure an escalation path to a human for questions the bot declines to answer. This combination significantly reduces user trust damage from wrong answers.
Full guide: Chatbot analytics — what to measure and why →
Common Mistakes to Avoid
Training on navigation HTML. Scraping your entire site including nav menus, footers, and sidebar links pollutes the knowledge base with noise. Use URL filtering or includePaths to target your docs, blog, and product pages specifically.
No pre-chat form. Anonymous conversations have zero lead value. A name + email gate (with a clear reason why you're asking) converts 30–50% of widget openers into captured leads.
Missing a handoff path. Some users don't want AI. They want a person. Build an explicit "talk to a human" trigger (a keyword or button) that escalates gracefully. Without it, you'll get angry users who tried three times to say "agent" and kept getting AI responses.
Deploying on all pages at once. Start with your highest-intent pages: pricing, features, and contact. Measure impact for two weeks before rolling out to the whole site.
Ignoring widget load performance. If your chatbot vendor's widget script is blocking your LCP, it's costing you more in SEO and conversion than the chatbot is recovering. Check your widget's script weight in Chrome DevTools Network tab before committing.
Skipping cookie consent integration. Most chatbot widgets set session cookies. If yours does, you may need to load the widget script conditionally, only after analytics consent is granted. Integrate with your cookie consent manager (CookieBot, OneTrust, or your CMP of choice) to fire the script on consent rather than on page load. Failing to do so is a GDPR liability.
FAQ — Embed Chatbot on Website
Can I add a chatbot to any website?
Yes, as long as you can add a <script> tag to the page HTML. Every major CMS (WordPress, Webflow, Wix, Squarespace, Shopify) has a custom code injection point. For frameworks like React and Next.js, use a useEffect component to manage the script lifecycle.
How much does it cost to add a chatbot to a website? Free tiers exist on Tidio, Botpress, and Chatbase, but with significant limitations (low message caps, persistent branding, inactivity timeouts). Meaningful paid plans start at $39–$79/mo for single-site use. Multi-site deployments using platforms like Canary are more cost-efficient at scale (~$12.70/site/mo for 10 sites).
Will a chatbot slow down my website?
It depends entirely on the widget implementation. Platforms built on full React can add 40KB+ to your page payload. Lighter implementations using Preact or vanilla JS sit under 5KB. Always load the widget script with async to prevent render blocking, and verify impact on Lighthouse before and after deployment.
How do I train a chatbot on my own content? Most platforms offer three methods: file upload (PDF, DOCX, TXT), URL scraping (automated crawl of your site), and manual Q&A pairs. For best results, use all three. Scrape your site for breadth, upload detailed documentation for depth, and add Q&A pairs for nuanced or frequently misunderstood topics.
How do I stop my chatbot from making up answers? Configure a confidence threshold (typically 0.4–0.5) below which the bot declines to answer rather than guessing. Enable source citations so users can see what document the answer came from. Write a clear system prompt that defines the bot's scope and explicitly says "if you're not confident, say so and offer to connect the user with a human."
Do I need coding skills to add a chatbot to my website? No, if your site uses a CMS (WordPress, Webflow, Wix, Squarespace, Shopify). All have GUI-based custom code injection where you paste a single script tag into a text field. Coding skills matter for React lifecycle management, CSP configuration, conditional loading for GDPR compliance, and programmatic widget triggers (auto-open after form submission, etc.). For most business sites, copy-paste is sufficient.
Conclusion
The technical embed is a 10-minute task. A production-ready chatbot, with a trained knowledge base, tested responses, and configured thresholds, is more like a half-day. The difference between a chatbot that frustrates users and one that resolves 70%+ of queries isn't the platform. It's the work that happens before and after the script tag.
If you're running a single site, Chatbase or SiteGPT will get you live quickly. If you're managing chatbots across multiple client sites or building a product where the widget's footprint matters, you'll feel the limitations of those platforms fast. Per-site costs, JavaScript payload, and the lack of multi-tenant analytics all add up.
Canary was built for exactly that gap: a 4KB Preact widget, per-tenant knowledge bases, GPT-4.1-mini with configurable confidence thresholds, and flat-rate pricing at $127/mo for up to 10 sites. No per-resolution fees, no credit burn system.
Want to run the numbers first? Use our chatbot ROI calculator → or jump into the getting started guide →.